WinUI3를 이용해 개발하다보면 User Control을 만들고 이를 이용할 때가 많습니다. xaml을 통해 일반 컨트롤러를 추가하면 그 컨트롤러와 관련한 Property나 Event를 실제 클래스와 연결하여 쓸 수 있는데 사용자가 만든 User Control은 어떻게 이런 Property나 Event를 추가해야 xaml에서 이것들을 사용할 수 있을까요? WinUI3 프로젝트 구성은 하실 줄 아신다고 생각하고 한번 실습 위주로 글을 써 보았습니다. (사실 UWP도 별반 다르지 않을거라 생각되나 WinUI3 문법을 쓰고 있어서 WinUI3 기준으로만 명령을 사용했기에 WinUI3라 적었습니다.)
프로젝트 파일도 올려 놓으니 참고하실 분은 다음 파일을 받아서 보셔도 됩니다.
일단 테스트를 위해 Blank App, Packaged (WinUI 3 in Desktop) 프로젝트를 하나 만들겠습니다.
이 테스트 프로젝트의 목표는 User Control을 하나 만들고, message라는 string property를 만든 다음, 여기에 property를 설정하면 click 이벤트 발생시 content dialog로 해당 property의 내용을 출력후 YES, NO을 물은 후 이응답을 Event로 넘겨주는 간단한 형태로 하겠습니다.

그 다음 Solution Explorer의 프로젝트에서 마우스 오른쪽을 눌러서 Add -> Class...을 누릅니다. 그다음 WinUI의 User Control (WinUI 3)을 추가하되 TestControl.xaml라는 이름으로 생성하겠습니다.


그리고 TestControl.xaml을 열어서 간단하게 버튼을 하나만들고 이벤트를 OnClick 함수와 연결하겠습니다.
OnClick 함수는 뒤에서 만들기로 하고 일단 넘어가겠습니다.
<?xml version="1.0" encoding="utf-8"?>
<UserControl
    x:Class="CustomControlTest.TestControl"
    xmlns="http://schemas.microsoft.com/winfx/2006/xaml/presentation"
    xmlns:x="http://schemas.microsoft.com/winfx/2006/xaml"
    xmlns:local="using:CustomControlTest"
    xmlns:d="http://schemas.microsoft.com/expression/blend/2008"
    xmlns:mc="http://schemas.openxmlformats.org/markup-compatibility/2006"
    mc:Ignorable="d">

    <Button Content="눌러봐" HorizontalAlignment="Center" Click="OnClick"/>
</UserControl>
TestControl 에 property 및 이벤트를 추가하기 위해 TestControl.xaml.cs 파일을 엽니다.
그리고 Testcontrol Class 내부로 가서 property를 추가하기 위해 propdp 라고 칩니다. propdp는 property dependency를 설정하게 도와주는 code snippet입니다. 다음과 같이 나오면 탭키를 두번 누릅니다.
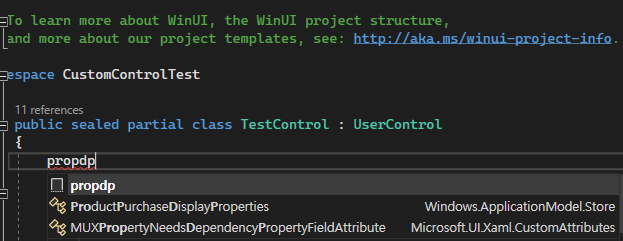
그러면 다음과 같이 자동으로 코드를 만들어 줍니다.

이제 여기서 필요한 부분을 바꿉니다. property 타입을 int에서 string으로 바꾸고 MyProperty라는 이름대신 Message라고 지정하겠습니다. typeof(ownerclass)는 typeof(TestControl)로 바꿉니다. 최종 형태는 다음과 같은 형태가 될 것입니다.
public string Message
{
    get { return (string)GetValue(MessageProperty); }
    set { SetValue(MessageProperty, value); }
}

public static readonly DependencyProperty MessageProperty =
    DependencyProperty.Register("Message", typeof(string), typeof(TestControl), new PropertyMetadata(0));
Property를 추가하였습니다. 이제는 Response라 Event를 추가해 보도록 하겠습니다.
EventHandler <string>를 public으로 추가하되 event라는 키워드를 함께 추가합니다. 그다음 버튼 Click 이벤트에 해당하는 함수 OnClick 함수를 만든 후 해당 함수는 Content Dialog를 띄우고, 결과를 저희가 만든 Response Event로 보내는 코드를 다음과 같이 작성하겠습니다.
public event EventHandler<string> Response;

async private void OnClick(object sender, RoutedEventArgs e)
{
    ContentDialog dialog = new ContentDialog();

    dialog.XamlRoot = this.XamlRoot;
    dialog.Style = Application.Current.Resources["DefaultContentDialogStyle"] as Style;
    dialog.Title = "메시지";
    dialog.PrimaryButtonText = "YES";
    dialog.SecondaryButtonText = "NO";
    dialog.DefaultButton = ContentDialogButton.Primary;
    dialog.Content = Message;

    var result = await dialog.ShowAsync();
    Response?.Invoke(sender, result == ContentDialogResult.Primary ? "YES" : "NO");
}
이제 Mainwindow.xaml에 다음과 같이 해당 Custom Control을 배치합니다.
새로 만든 Message Property를 이용해 값을 세팅하고 Response 이벤트를 OnResponse 함수와 연결합니다.
<?xml version="1.0" encoding="utf-8"?>
<Window
    x:Class="CustomControlTest.MainWindow"
    xmlns="http://schemas.microsoft.com/winfx/2006/xaml/presentation"
    xmlns:x="http://schemas.microsoft.com/winfx/2006/xaml"
    xmlns:local="using:CustomControlTest"
    xmlns:d="http://schemas.microsoft.com/expression/blend/2008"
    xmlns:mc="http://schemas.openxmlformats.org/markup-compatibility/2006"
    mc:Ignorable="d">

    <local:TestControl x:Name="test_control" Message="YES나 NO를 누르시오" Response="OnResponse"/>
</Window>
이제 MainWindow.xaml.cs에 다음과 같이 OnResponse 함수를 추가합니다.
public void OnResponse(object sender, string result)
{
var flyout = new Flyout();
var text_block = new TextBlock();
text_block.Text = $"'" + result + "' 버튼을 눌렀어요";
flyout.Content = text_block;
flyout.ShowAt(test_control);
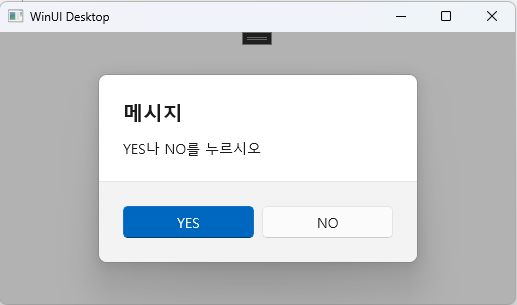
}이제 코딩이 모두 끝났습니다. 프로그램을 실행해 봅니다.
다음과 같이 버튼이 나오고, 버튼을 누르면 content dialog로 yes/no을 물으며, 클릭후에는 선택 이벤트를 받아서 flyout로 선택된 버튼이 표시됩니다.


'C#' 카테고리의 다른 글
| win32 API로 디스플레이 확장/복제 설정하기 (0) | 2023.04.17 |
|---|---|
| [C#.NET] C# 에서 C++ Windows Runtime Component 사용하기 (0) | 2022.12.02 |
| [C#.NET] Laptop Battery 정보 얻기 (Power Status) (0) | 2022.09.26 |
| [C# .NET] COM 통신 (4) | 2022.09.21 |


